In this document
- Configuration Workflow
- Configuration Details
- Importing the Email HTML into Marketing Automation Software
Configuration Workflow
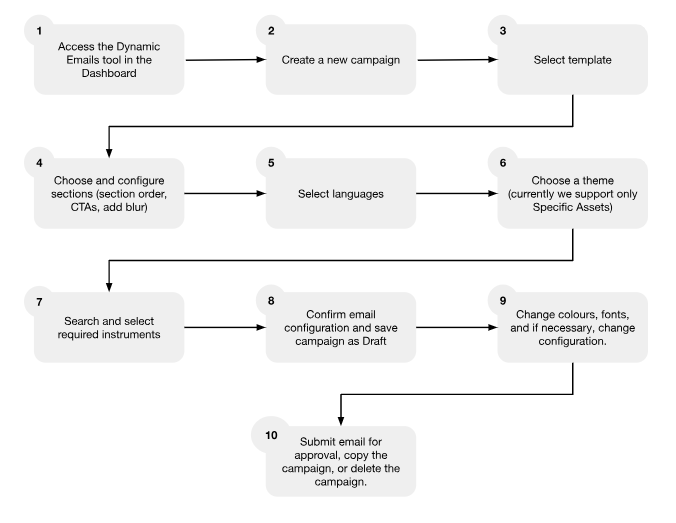
Configuration Details
Campaigns Overview
The initial page in the Dynamic Emails editor lists all campaigns that were previously created and allows you to create new campaigns.
The campaigns will be in one of the following statuses:
- Draft – these are campaigns that you are still working on, and they can be fully modified and further customised at any point.
- Submitted – these are the campaigns that you have configured fully, and they are pending review by our admins to ensure that the configuration for assets and languages you selected is correct, and that it is within the previously defined contractual limits.
- Active – these campaigns have been reviewed and approved by the admins, which means they are being actively updated from Acuity servers.
- Cancelled – this means the email exists, but no delivery is taking place (and the template is not being updated).
Template
When creating campaigns, it will be necessary to select a template. Currently we support a Single Asset template, but the Multi Asset one is in the works.
A Single Asset template allows users to select datasets and email sections that cover a specific asset (for example, Economic Events and a Trade Idea about EURUSD).
A Multi Asset template, on the other hand, allows you to select multiple instruments that will be included in a single email. For example, you can choose FX Majors, Metals, or a completely custom combination of popular instruments on your platform.
Sections
The dynamic email supports the following sections.
- Header (enabled by default and cannot be disabled)
- News Sentiment
- News
- Market Chart
- Trading Signals
- Trade Idea
- Events
- Most Associated Assets
Each section supports several features or actions that could be applied to it:
-
- Enable/Disable Section – each section, apart from the header, can be disabled. This is to ensure that each created campaign is unique and can target a specific use case.
- CTA (Call to Action) – it is possible to add a Call to Action under each section and customise the CTA Text and the CTA URL where the user will be redirected to on click. We support 2 predefined CTA texts (Trade Now and Open Account), but it’s possible to customise the text as well. CTAs support translation.
- Blur – useful for acquisition purposes. A section can have important details blurred out, which can be useful to incentivize a user to take a certain action, such as sign up for a live account, fund an account etc.
Sections can also be reordered in any order that is required. The only section that cannot change its position is the Header.
Multi Asset Template Sections
When configuring Multi Asset templates, the sections you will have access to are the same as with the Single Asset templates, but the configuration process will be slightly different.
This is the process:
- Choose the sections that apply to any asset in the template by clicking the ADD SECTION button in the bottom-left corner of each asset
- Configure the sections using the logic, described above and add CTAs, blurs and other components.
- When you are happy with the selection, click the APPLY SECTION CHANGES button that appears upon editing a section.
- Repeat this process for the remainder of the sections.
This will allow you to add different sections to assets used in the template.
If you want to use the same sections for all assets in the template, click the Copy sections to other assets button in the bottom-right corner of the configured asset prior to clicking the APPLY SECTION CHANGES button from step 3 above.
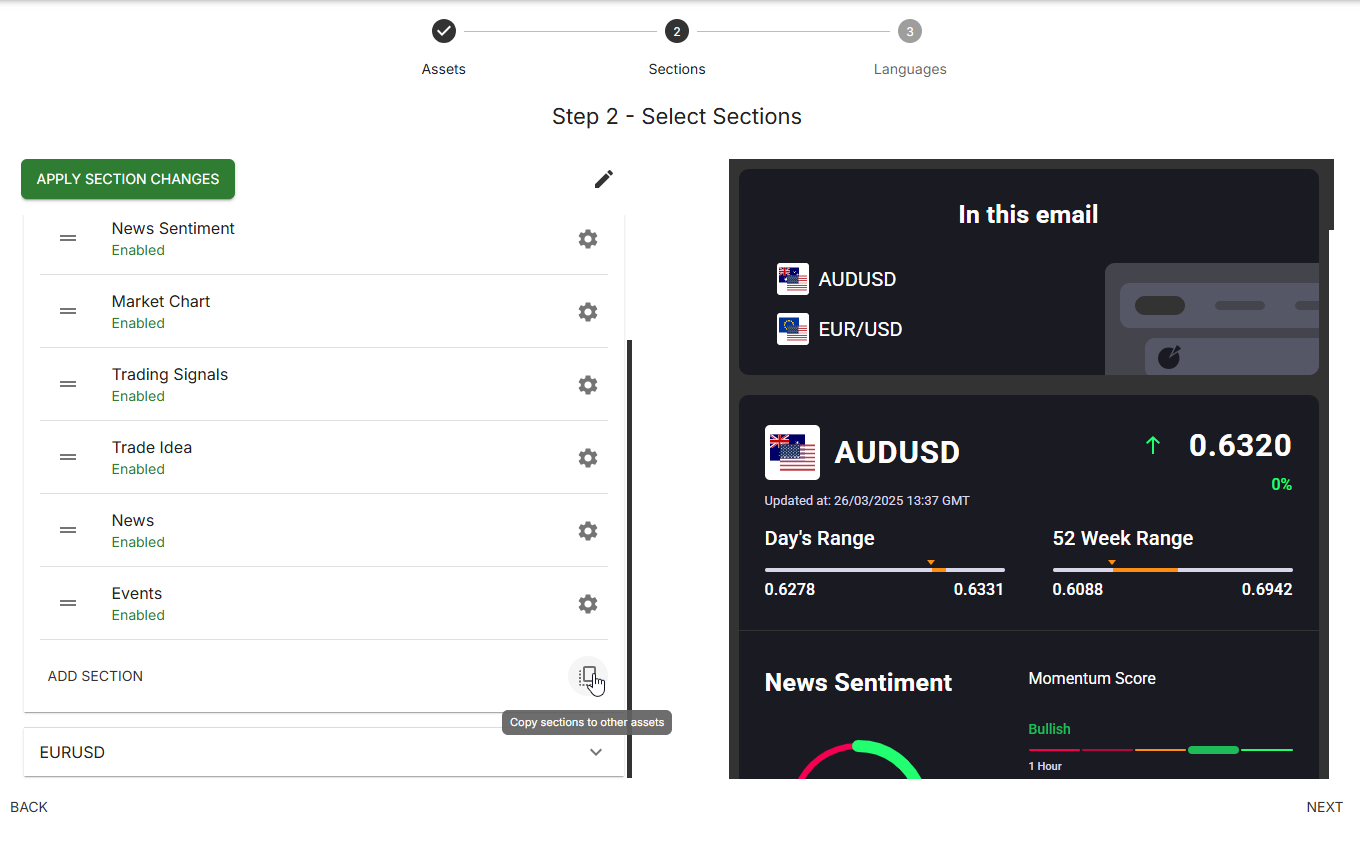
To reorder the assets in the Multi Asset template, click the pencil icon in the top-right corner of the section selector, which will allow you to select the order of the assets in the template.

Note: only 10 assets can be selected for an email at maximum. For the best experience though, we recommend using no more than 5. Otherwise the templates become too long to read, and it's unlikely that the users will get through the full email.
Languages
Not all datasets support all languages that are supported in our platform. Because of this, when selecting the languages, we will highlight the datasets that don’t support a language that has been preconfigured on your account.
Sections that don’t support a particular language will be provided in English.
For many languages this will be OK, but please be wary of this when configuring templates in RTL languages (e.g., Arabic).
Theme
Theme is what controls the main focus of the email template. Currently we support a “Specific Assets” theme, so the templates are centred on a particular instrument, for example EURUSD.
Assets can be selected using a Search menu or by using predefined asset lists. Currently available asset lists include:
- Major / Minor / Exotic Currency Pairs
- Metals / Agricultural / Energy Commodities
If you want to add stocks to your template, please use the Search box.
Once you’ve found the required instrument in the list, please select it, so that it would get moved into the box on the right.
You can select a virtually unlimited number of instruments, but please note that their amount will contribute to the processing costs.
Theme selection is not supported for the Multi Asset templates yet.
Campaign Summary
At this point you will be presented with a summary of the campaign so far. Please verify that everything is correct, name your campaign, and save it as draft.
It will be possible to modify the campaign afterwards as well, in case something was incorrectly selected or is incomplete.
Template Look & Feel
Once the campaign is saved as Draft, you can open it via the Dynamic Emails link menu and modify its look and feel.
The following modifications are currently supported:
- Logo – you can add a logo to the top of the template. This image doesn’t need to be only a logo - you can include a full email header in this area. The dimensions of the image are not enforced in any way, only the size is - it can’t be larger than 1MB in size.
- Colours – it is possible to modify the colours of each section and its components to match your branding guidelines.
- Fonts – we support both public and private fonts. The template requires the fonts with the following weights: 400 (Regular), 500 (Medium), 600 (Semibold), 700 (Bold).
-
- Public Fonts – this is something that can be retrieved from a site like https://fonts.google.com/ It will be necessary to select the weights specified above, and retrieve the URL containing these weights. For example, here is how the Open Sans URL looks like: https://fonts.googleapis.com/css2?family=Open+Sans:wght@300..800&display=swap
Note: you can include the URL containing the full axis of the font. It’s important that all the selected weights are available with the added URL.
-
- Private Fonts – if you have a custom font that is not retrievable from a public URL, you can upload the .TTF files for the same weights using the corresponding menu item.
You can switch between Assets and Languages using the dropdown menus above the preview to see exactly how the template looks like in those configurations as well.
Email Footers
Creating footers
To create a footer, please access the Dynamic Emails Main Page and click the cogwheel next to the "Create new email" button.
If you haven't created any footers, you will be asked to enter the name and the optional description of the footer you're adding.
Once done, click the Add Translation button. This will allow you to add the footer version in multiple languages. The appropriate language footer will be selected at the point of choosing the language further in the template editor. Use the same button when adding the default English disclaimer as well.
You can provide the footer in plain text or HTML format, which will allow you to highlight certain parts of the text and include links.
Here is a recording of the process of creating a footer in English and Spanish.
Using footers in templates
It's important to note that footers are not part of the templates themselves. They are simply used at the point of retrieving the HTML.
The benefit of this is that you can use multiple footers in the same template, without having to create a copy of the template just for the sake of applying a different footer. This can be used when you want to send an email to users in multiple jurisdictions (e.g., CYSEC, FCA etc).
Once the different language versions of the footer are added, proceed to the template that you want to attach the footer to.
You will be able to select the footer on the Style Editing step prior to requesting approval (and actually post-approval as well).
You can choose the footer alongside the asset and the language that you created the template for.
The process of retrieving the HTML will involve the following steps:
- Select the Asset
- Select the Language
- Select the Footer. The template editor will choose the appropriate language of the footer (based on the language of the template). If the language of the template is not found in the footers, it will default to English (assuming English Translation was added).
Here is a short video demonstrating the process.
Template Summary
While modifying the template, you will be able to see the summary of the configuration on the right.
You will be able to enable/disable and reorder the sections, add blur to them, modify the CTA, modify assets and languages while the template is in the Draft status.
You can also make a copy of the template or delete the campaign altogether in this area.
Once you are happy with everything, the email template needs to be submitted.
Note: after the email is submitted, you can change the colours and the fonts used, but not the selected sections and their order, CTAs and blur.
If you want to add changes to the template configuration after the submission, you will need to copy the existing campaign. Copying the campaign from any status will place the copy into Draft status and you will be able to configure it fully.
Campaign can be copied and deleted at any time, including when it’s Active.
Campaign Approval Process
Once the template is submitted, it will be reviewed by the admins to ensure the configuration is correct and the selected asset/language combinations are within the contracted limits.
If the campaign is rejected, it will be returned to the Draft status and you will receive an email, informing you about the status change. At that point someone from Acuity will reach out and explain why the campaign did not go through.
You will be receiving emails in the following campaign status updates:
- Submitted to Active
- Submitted to Cancelled
- Active to Deleted
If the campaign is approved, it will move to the Active status and the images will start to be generated for the selected instruments and languages.
Importing the Email HTML into Marketing Automation Software
Once the campaign is approved and is in Active status, the images used in the template will be continuously updated via the Acuity servers.
The current update time is every 10 minutes, which means that the information in the email template will be at most 10 minutes old.
To import the resulting HTML campaign into your marketing automation system, there are two main ways:
Retrieve the Email HTML from the Campaign Editor
Once the template has been approved and active for at least 10 minutes, you will see a Show Code button that will allow you to get the full template HTML that you can copy and paste into your email system.

The HTML will contain just the table element, so if necessary, you can add a footer at the point of adding it into your email system.
Retrieving HTML files for multiple assets, languages, and footers.
If you have many assets, languages, and footers in your campaign, it can be quite time-consuming to retrieve the HTML file for each parameter combination.
To help with this, we've added an option to retrieve all available HTML files in bulk.
Here are the steps to follow to retrieve all HTML files:
- Open the template you want to retrieve the HTMLs for
- Select the footer that you would like to generate the templates with
- Click the Show Code button
- Select the "Download all templates for this campaign" option
The retrieved ZIP file will contain all the required HTMLs in the {instrument}({language}).html format.
If you have multiple footers, repeat this process for all of them.
Work with Acuity Dev Team to send the HTML via your Marketing Software API
If the “manual” retrieval of the HTML template does not work for you, we can send the HTML template directly to your Marketing Software via its API.
Please let us know if you’d like to use this option and we can take it from there.
If you have any questions or would like to discuss creating content with us, please don't hesitate to contact us. We are here to help!