In this article:
Trade Token Endpoint
What is it and why is it needed?
The broker will utilize the token endpoint to create a trade token, which will securely enable the user to trade from the client portal. This token prevents impersonation attempts, as it makes it impossible for an unauthorised user to send trade requests, even if they can view underlying web requests.
Additionally, the token endpoint is necessary for retrieving the symbols that the user of the client portal is permitted to access. This ensures that the user only sees the symbols that are available to them through the MT server.
Endpoint Functionality
URL: https://dashboard.acuitytrading.com/GetTradeAuthorizationToken?apikey=YOUR_API_KEY
Method: POST
Content-Type: application/x-www-form-urlencoded
Required Parameters
- login (int) - the account login of the MT user, on behalf of which the trade requests will be sent. Example: 960011869
- version (int) - the MT version that this user is from.
- 4 for MT4
- 5 for MT5
- server (str) - the server the login belongs to, in case multiple servers are supported. Note: the server should only be a DNS or an IP address. Example: ukdc11.metaquotes.net:443 or 192.168.4.123:443
- time (int) - the current epoch (Unix) timestamp in seconds. Example: 1741020799
- hash (str) - a hash that needs to be generated using the example code below.
To generate the hash, you will also need to pass a hash salt. It’s a special string of characters that will be used to encrypt the previously passed information. This salt is account-specific, so will be different for each Acuity user ID. Please also note that the order of parameters that is passed in the string to generate the hash is important.
- Login
- Version
- Time
- Server
- Hash Salt
Note: it is also required that the server you will be passing in the request described below is configured in your Acuity account.
Retrieving the hash salt
The hash salt is a unique string that is generated for every user in the Acuity dashboard. It is automatically generated when a user is created in the dashboard.
You can retrieve the salt by going to your account page and copying the Trade Token Generation Salt value from the Keys section.
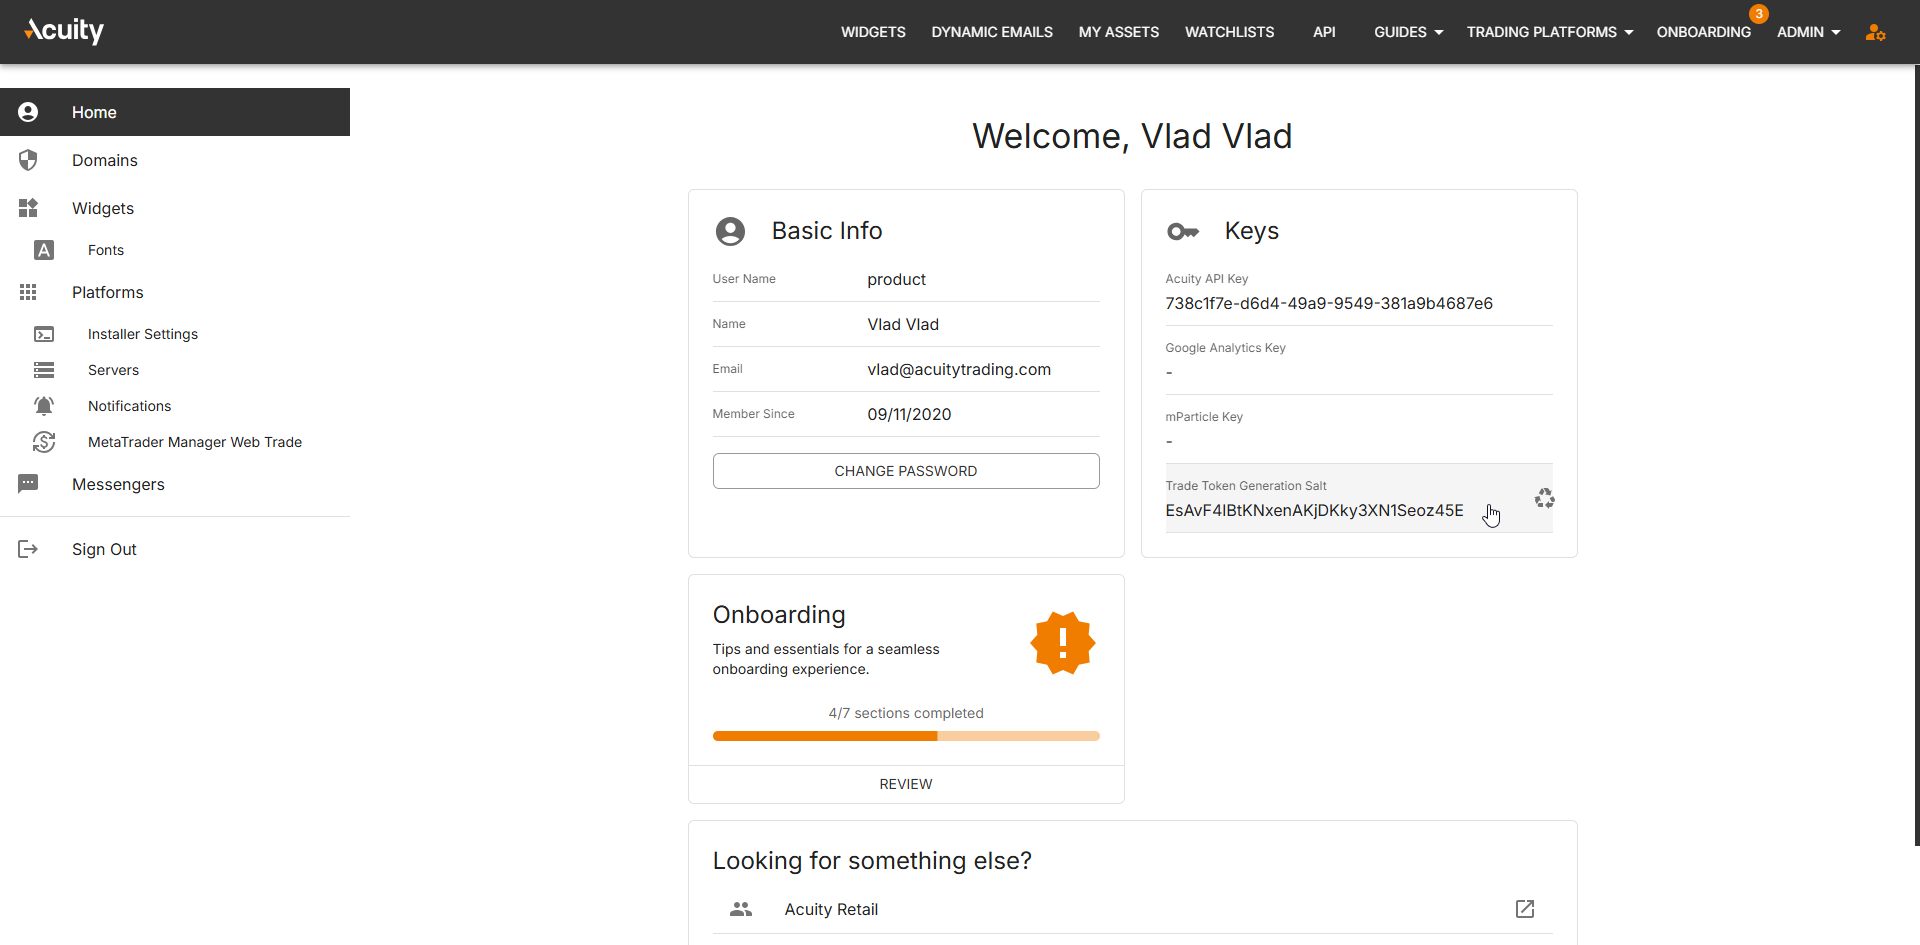
This key will work with all servers that you configure.
If necessary, you can regenerate the salt by clicking the "recycle" button. Please note that by doing that all instances where you are trying to generate the trade token will stop working and the salt needs to be replaced in all of them.
Configuring the Trade Servers
To configure the Trade Servers where the web trading functionality will be supported, please click the MetaTrader Manager Web Trade link in the Platforms category on the accounts page, or go to this link directly (please ensure you are logged into your Acuity dashboard account).
The process after that is as follows:
- Click the "Add" button in the bottom-right corner of the page
- Name your trade server (could be anything)
- Provide your server IP address or DNS name. Note: this is important as we will be using it to connect, and the same server needs to be passed to the endpoint below to retrieve the trade token.
- Choose the server type (MT4 or MT5).
- Enter the MT Manager Login that will be used for the trading functionality
- Enter the password. Note: the password will be stored as an encrypted hash on our side, so we will not have access to it.
- After that you can either click Validate, which will test the connection (and retrieve the first set of symbols available on the server) or click Save, which will store the server information on our side.

Sample Python code to generate the hash Retrieving the hash salt
from hashlib import sha256
from base64 import b64encode
from time import time

sha = sha256()
login = 960011869
version = 5
time = int(time())
server = "mt5.metaquotes.net:443"
hash_salt = "YOUR_HASH_SALT_HERE"
payload = "login=" + str(login) + "&version=" + str(version) + "&time=" + str(time) + "&server=" + server + hash_salt
sha.update(bytearray(payload, 'ascii'))

hash = b64encode(sha.digest()).decode()

print(hash)
Example Response
- HTTP 200 (OK)
- Supported Platform (MT4 & MT5) JSON Response: https://pastebin.com/Ghg9auJM
- HTTP 403 (Forbidden)
- Invalid hash
- Token request is sent after 20 seconds after generating the hash (hash is valid for 20 seconds).
Widget Declaration
<script> and HTML-based integration
The widget HTML will need to receive the new values that are provided in the response. In particular, the following elements:
- TradeToken
- SymbolsId
- AllSymbols
The widget HTML will look like this:
<div id='acuity-widget-div'></div>
<script src='https://prodstorage.azureedge.net/Widgets/lib/@1.0.0/widget-core.js'</script>
<script>


 window.tradeToken = data.TradeToken;
 window.metatraderSymbolsId = data.SymbolsId;
 window.allSymbols = JSON.parse(data.AllSymbols);


 AcuityWidgets.globals({
 apikey: 'YOUR_API_KEY',
 locale: 'YOUR_LOCALE'
 });


 var widget = AcuityWidgets.CreateWidget(
 'ACUITY_WIDGET_NAME',
 document.getElementById('acuity-widget-div'),
 { settingId: SETTING_ID }
 );

 widget.mount();
</script>
Note: apikey, widget name, setting ID, locale and the Acuity widget divs will change depending on the broker and the widget that is used for the trading functionality.
This version of the widget HTML is slightly different from the one that you can retrieve from the Acuity Dashboard. By adding these 3 parameters before the widget is initialised, it will know that the trading functionality needs to be supported.
<iframe>-based integration
Base URL: https://dashboard.acuitytrading.com/widgets/widget
For the iframe-based integration to work, it will be necessary to pass the following parameters in the widget URL, that will be used as the iframe source (src parameter value).
Supported URL Parameters:- widgetName - should be set to the same value as ACUITY_WIDGET_NAME above
- settingId - the SETTING_ID parameter from the example above
- apiKey - the YOUR_API_KEY parameter from the example above
- lang - the YOUR_LOCALE parameter from the example above
- tradeToken - the same trade token that is generated via the previous step. Note: it needs to be url-encoded
- symbolsId - this is the equivalent of the metatraderSymbolsId parameter retrieved via the previous step.
Example to use in the
<iframe src="https://dashboard.acuitytrading.com/widgets/widget?widgetname=ACUITY_WIDGET_NAME&apikey=YOUR_API_KEY&lang= YOUR_LOCALE&tradeToken=TRADE_TOKEN&symbolsId=SYMBOLS_ID&settingId=SETTING_ID" width="100%" height="100%"></iframe>
Trading Functionality
Account Requirements
The TradeToken will encode the user's account login, which is required by the Acuity Widgets to identify the user placing trades. The underlying page in the client portal will need to utilise the previously described token endpoint and provide the user's account login to execute trades.
If a user has multiple logins, they must specify the account they wish to trade on before the widget loads.
This can be achieved by using a dropdown menu. Here is an example.
Placing Trades
The process of placing trades is similar to MetaTrader 4 and 5.
- First, the user clicks the Trade Now button in the widget.
- Next, an order window opens, allowing them to choose the volume and review other trade details.
- Finally, they click Place Order for Pending Orders or Buy by Market/Sell by Market for Market Execution orders to execute the trade.
Examples:
Pending Order

Market Execution Order
The user can view their placed order in the Trade tab of their MetaTrader login. The order can be cancelled there, if needed.
Open positions can be seen and managed in the client portal, if it is configured to display this information.
Symbols Retrieval and Update Process
To ensure the functionality works correctly, we need to retrieve the user's assigned groups and the list of available symbols per group in MT.
We will fetch all symbols for all users on the server (for which we have the Manager Account) once a day around midnight UTC. New users will be updated every 15 minutes.
There is a possibility that symbol updates for new users (not included in the nightly update) may be delayed for up to 15 minutes after their initial login. In this case, a default watchlist will be shown, and checks will be enabled to prevent trades on unsupported symbols. The likelihood of this scenario is low, as most users will be loaded during the nightly and continuous processes.
If a user attempts to initiate a trade on an unsupported symbol, an error message will be displayed: "Orders cannot be placed for this trade idea at this time. Please try again later."
MetaTrader Manager Requirements
The MetaTrader Manager account needs to have the RIGHT_TRADE_MANAGER permission to place trades on behalf of users.
Additionally, it requires access to user groups on a particular server to determine symbol entitlements.
MT4
Access Rights
- Connections (show online clients)
- Supervise trades
- Market Watch
Trading Transactions
- Dealer
MT5
Connection Type
- Connect using MT5 Manager
Accounts
- Access Accounts
Dealing
- Access orders and positions
- Edit orders, positions and deals
- Dealer
- Supervisor
Comments
- Access comments
- Add comments
- Delete comments
Back Office
- Clients
- Access clients
- Access clients
IP Restrictions
If you have firewalls or other network restrictions, you may need to whitelist the relevant IP addresses to successfully generate a Trade Token.
Please contact support@acuitytrading.com for a complete list of IP addresses.